
Instructions for Installing a Strum Fix in a Rock Band Precision Bass guitar
Overview
NOTE: There are both WIRED and WIRELESS versions of the Precision Bass, and while the installation is very similar, there are some differences in how the wires are connected so be sure to follow the appropriate instructions.
Requirements
Strum Fix Plus (any version) or Strum Fix DUO, PBA Adapter, Rock Band Precision Bass guitar (wired or wireless)
Tools Needed
Medium Phillips screwdriver for opening up the guitar and removing parts.
Small flat-blade screwdriver for tightening the screw terminals on the Strum Fix.
Wire cutters/strippers or a knife for connecting wires to the Strum Fix.
Remove Old Strummer
The procedure to open up the guitar and remove the old strummer is very similar to the procedure that's used on most of the other Rock Band Stratocaster or similar guitars. More info: https://www.bytearts.com/strum-fix-plus-installation
Remove Guitar Back Cover
Remove all the screws from the back side of the guitar body. Some guitars use a couple different length screws so it's a good idea to keep track of which hole each screw was in. Once the back cover is removed you'll see the strummer mechanism which is held in place with a black plastic bracket.
Disconnect Wires to Old Strummer
Wireless Bass
On the wireless bass there are 3 wires running to the strummer: one of them should have a red stripe on it, this is the "common" or ground wire; the other two wires are the "up" and "down" strum connections. You will need to cut the wires that go to the original strummer - cut them as close to the strummer PCB as possible so that the remaining wire is as long as possible.
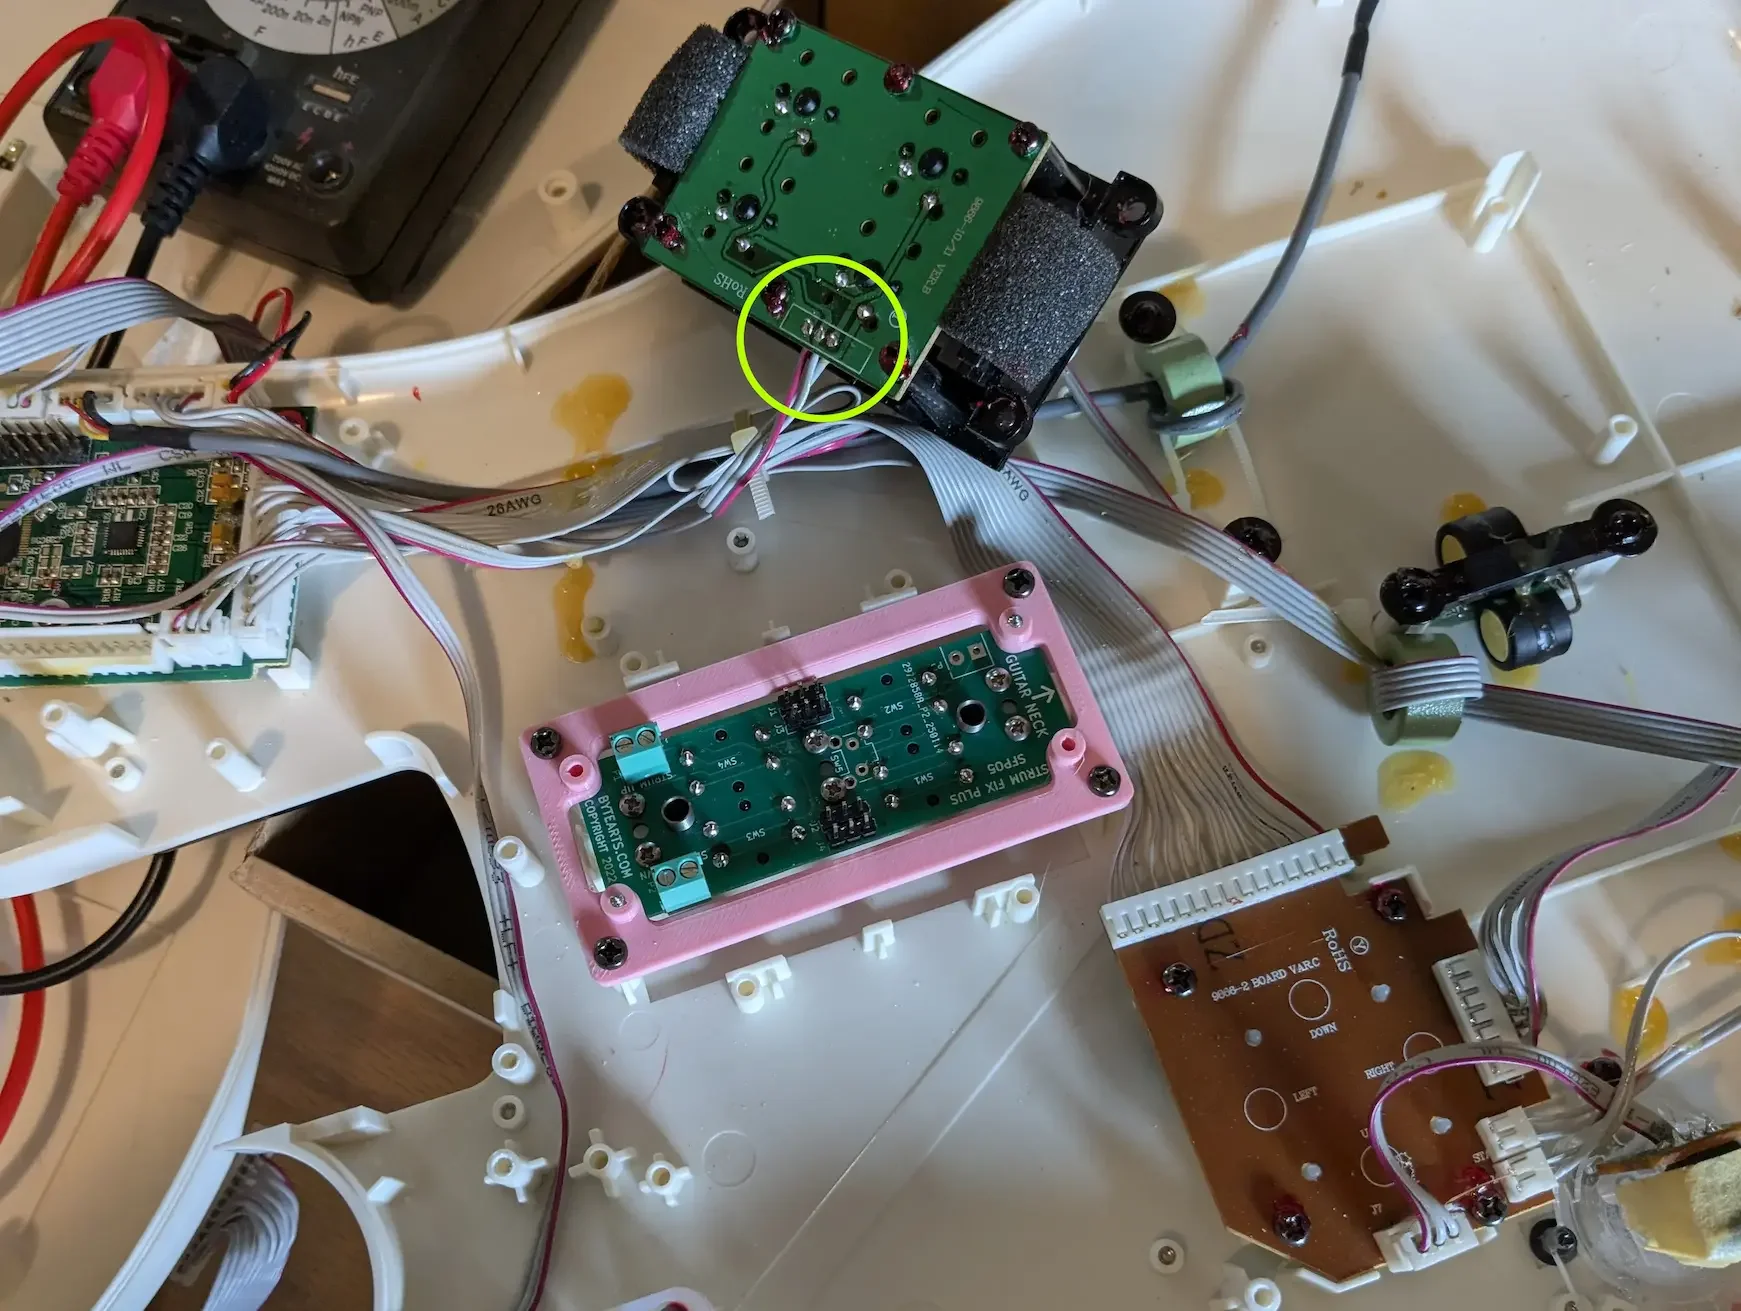
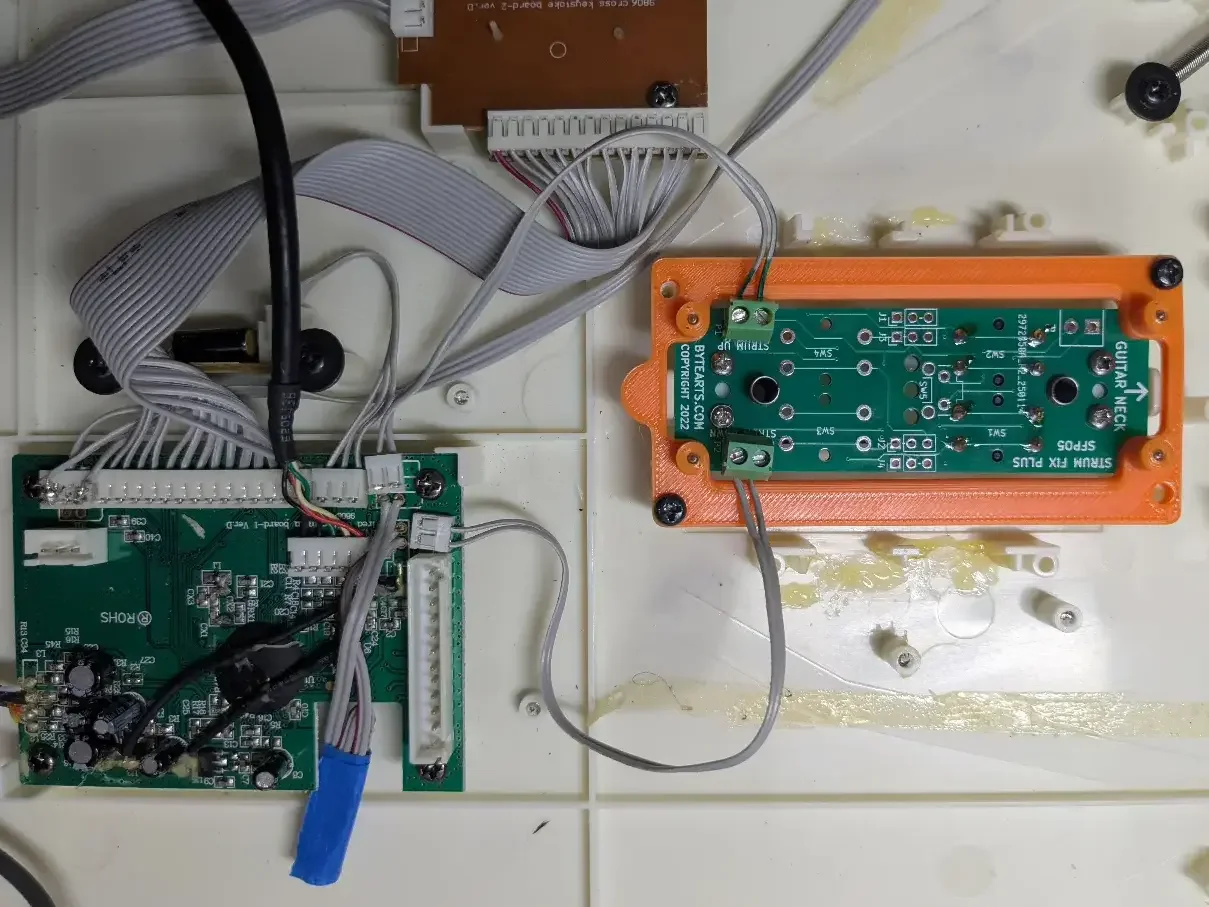
This picture shows a Wireless bass with the original strummer removed, but the wires to it are still attached (circled in green). The Strum Fix has been installed in the PBA and both have been set in place but not secured yet.
Wired Bass
The wired Precision Bass has 4 pairs of wires going to the strummer, as shown here:
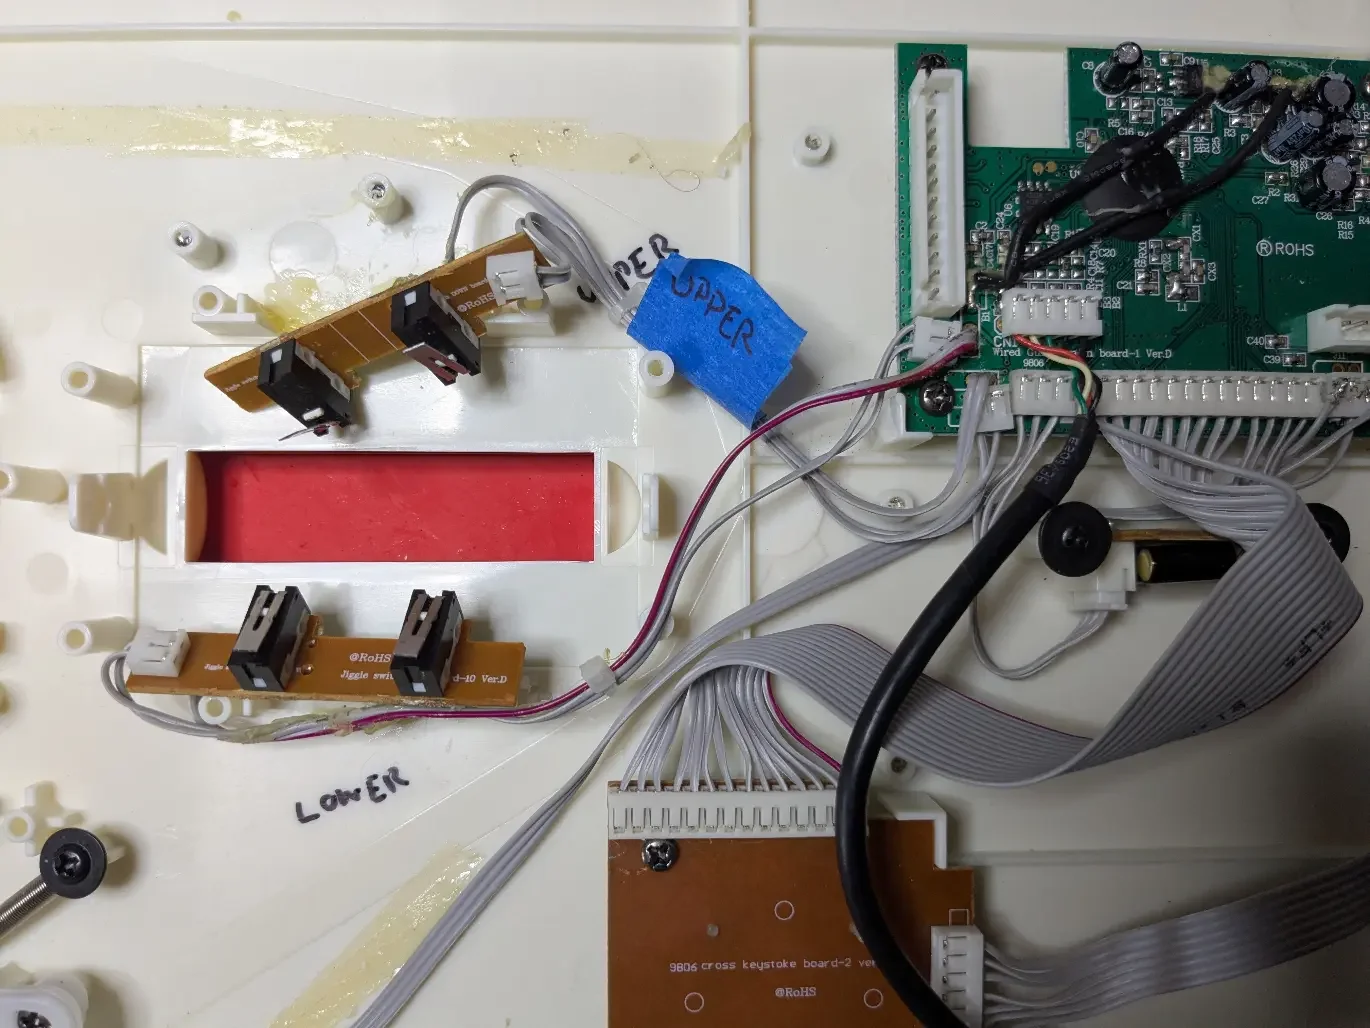
This image shows the original strummer wiring on a wired Precision Bass. The original strummer has been removed, but the original strum switches are still in place.
Each pair of wires contains two signals: a ground, and a strum switch signal. Each set of wires are connected to one of the two small PCBs on the strummer with switches on them. Cut each of the wires where it connects to the small PCB with the switch.
There may be some old, dried up glue holding some wires in place - if you heat the glue with a hot air gun or hair dryer it will soften and can be removed.
Remove Old Strummer
Remove the screws holding the strummer in place and remove the strummer assembly. Keep the screws handy - you will need them later.
INSTALL NEW STRUMMER
Install Strum Fix in the PBA adapter
The adapter comes with 4 screws for holding the Strum Fix Plus (SFP) or DUO in the adapter. The SFP should be placed in the adapter so that it sits flat against the adapter. There are 4 cylindrical "studs" that protrude from the adapter - the SFP should be installed on the side of the adapter WITHOUT the studs, as shown in the picture below.:
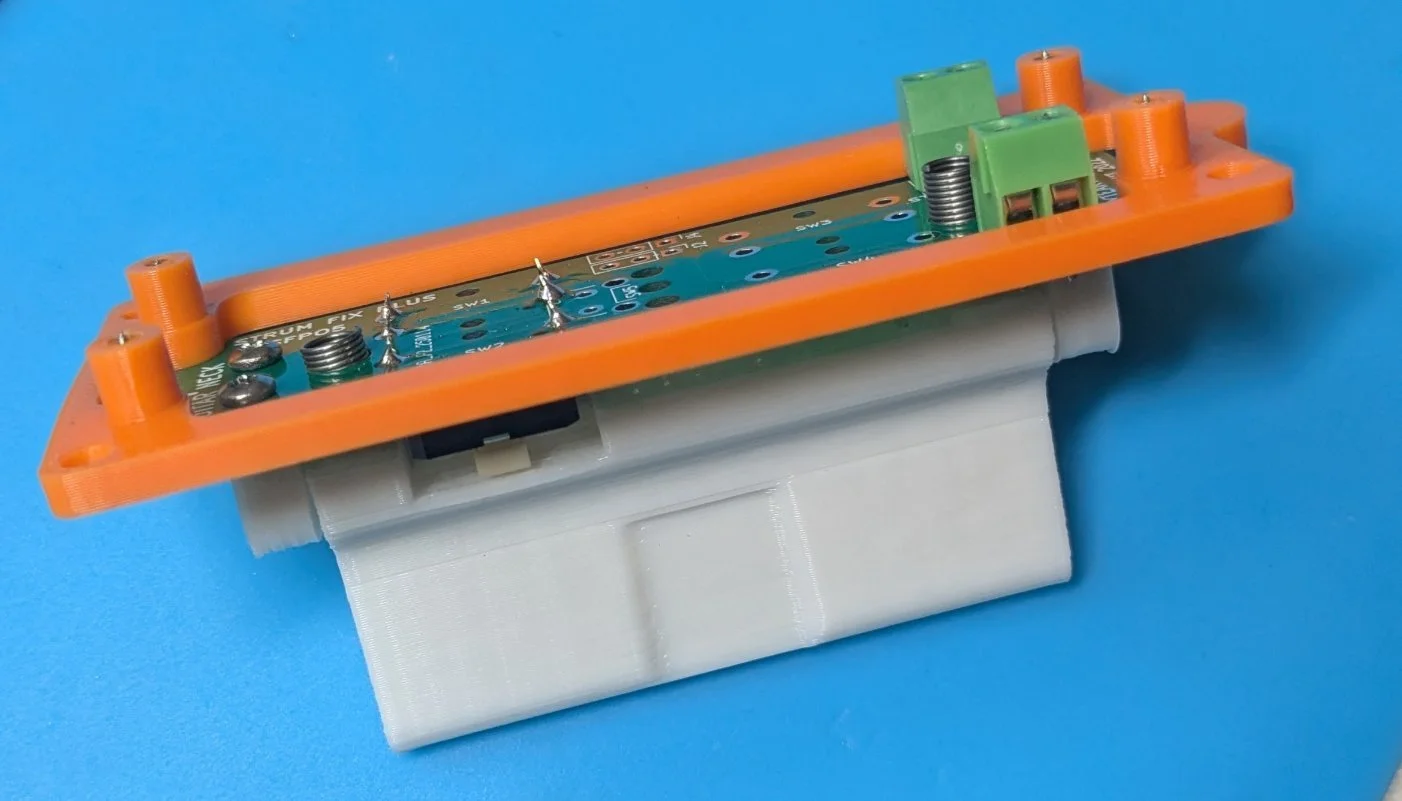
Strum Fix Plus installed in PBA adapter.
NOTE: The orientation of the strum fix within the adapter doesn't really matter, but you may need to flip it around so that the strum wires from the motherboard can reach the green terminals so you may want to "test fit" the strum fix in the guitar and check that the wires reach.
Install adapter in guitar
There is a small half-round tab on one end of the adapter - this is to prevent the adapter from being put in the wrong orientation - the tab should be on the opposite side as the neck as shown here:
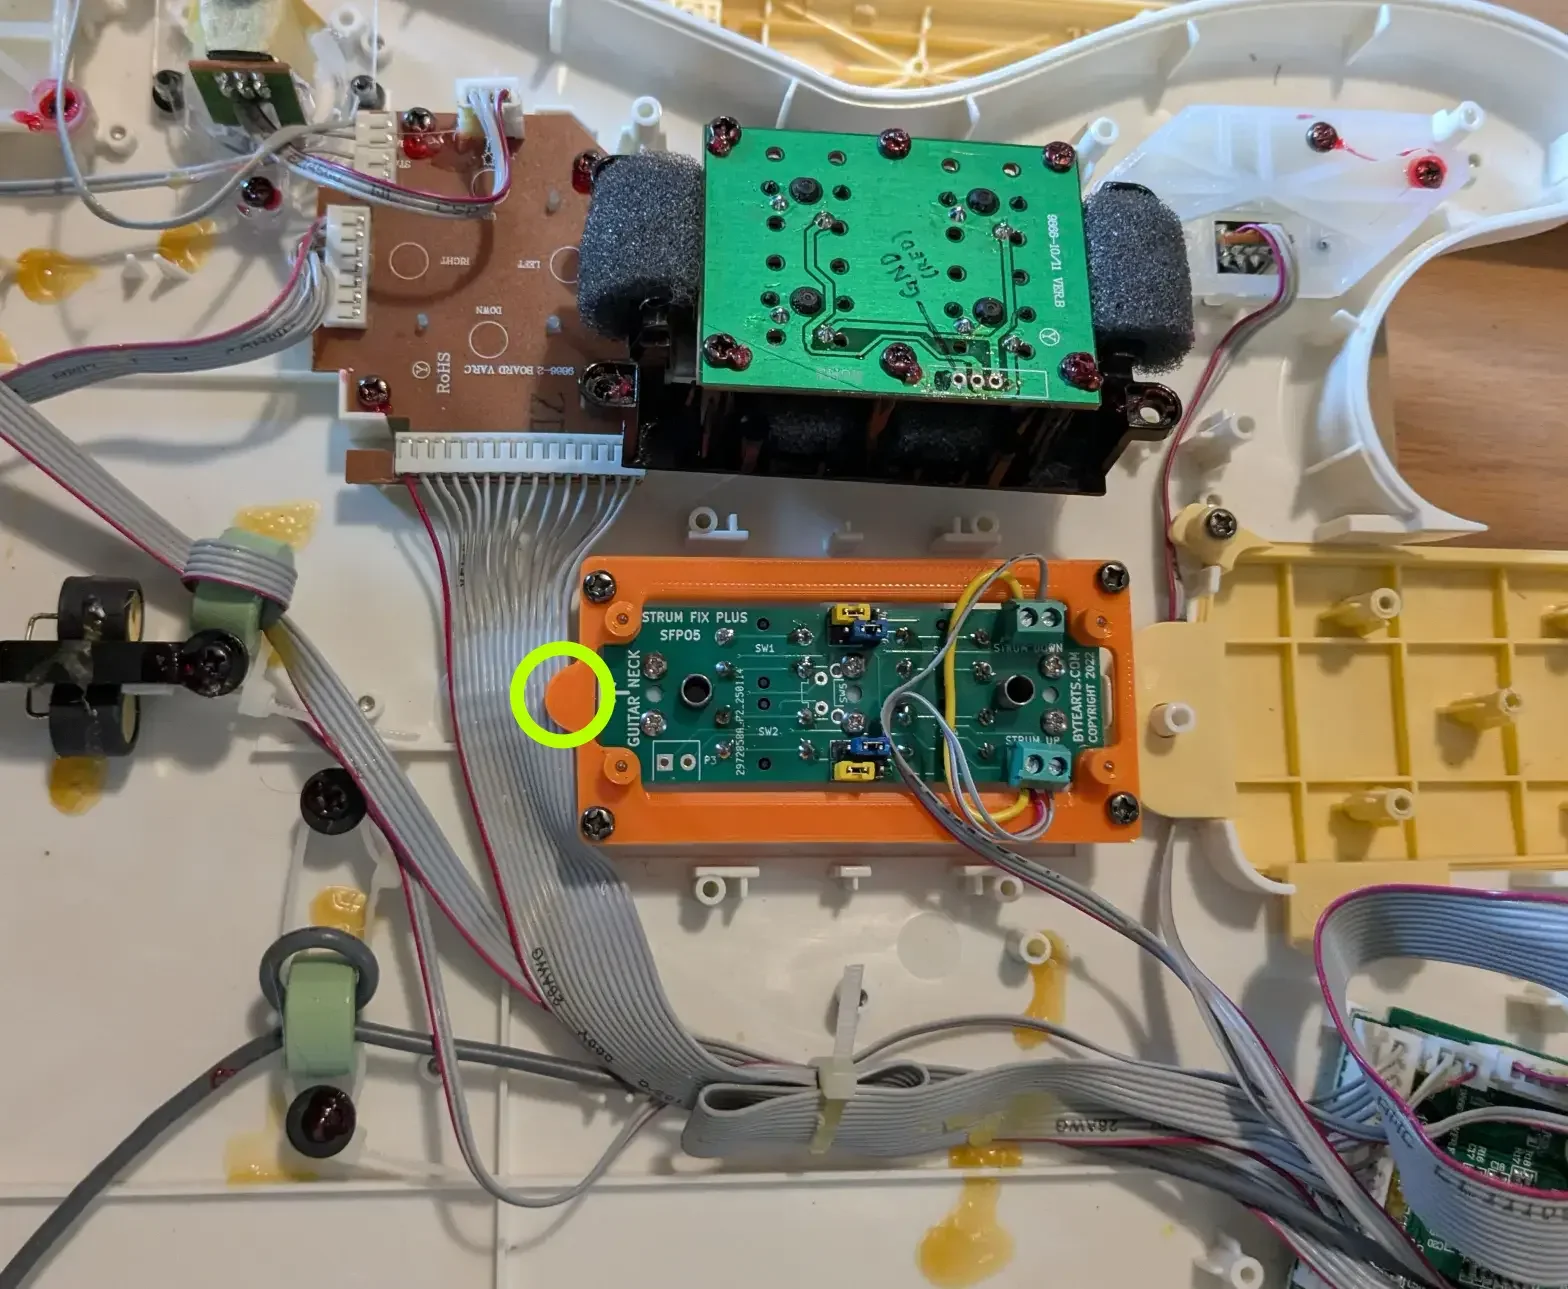
Strum Fix w/PBA adapter in guitar - notice the orientation of the circled tab in relation to the neck.
Connect Wires
The wired and wireless versions of the Precision Bass use different wiring schemes so be sure to use the correct procedure below.
Wireless Precision Bass
The wireless bass has 3 wires which connect to the strummer - 1 ground (GND), 1 up strum and 2 down strum. The GND wire usually has a red stripe on it. The PBA is supplied with a short piece of wire that is used to connect the GND wire to both of the terminals as shown here:
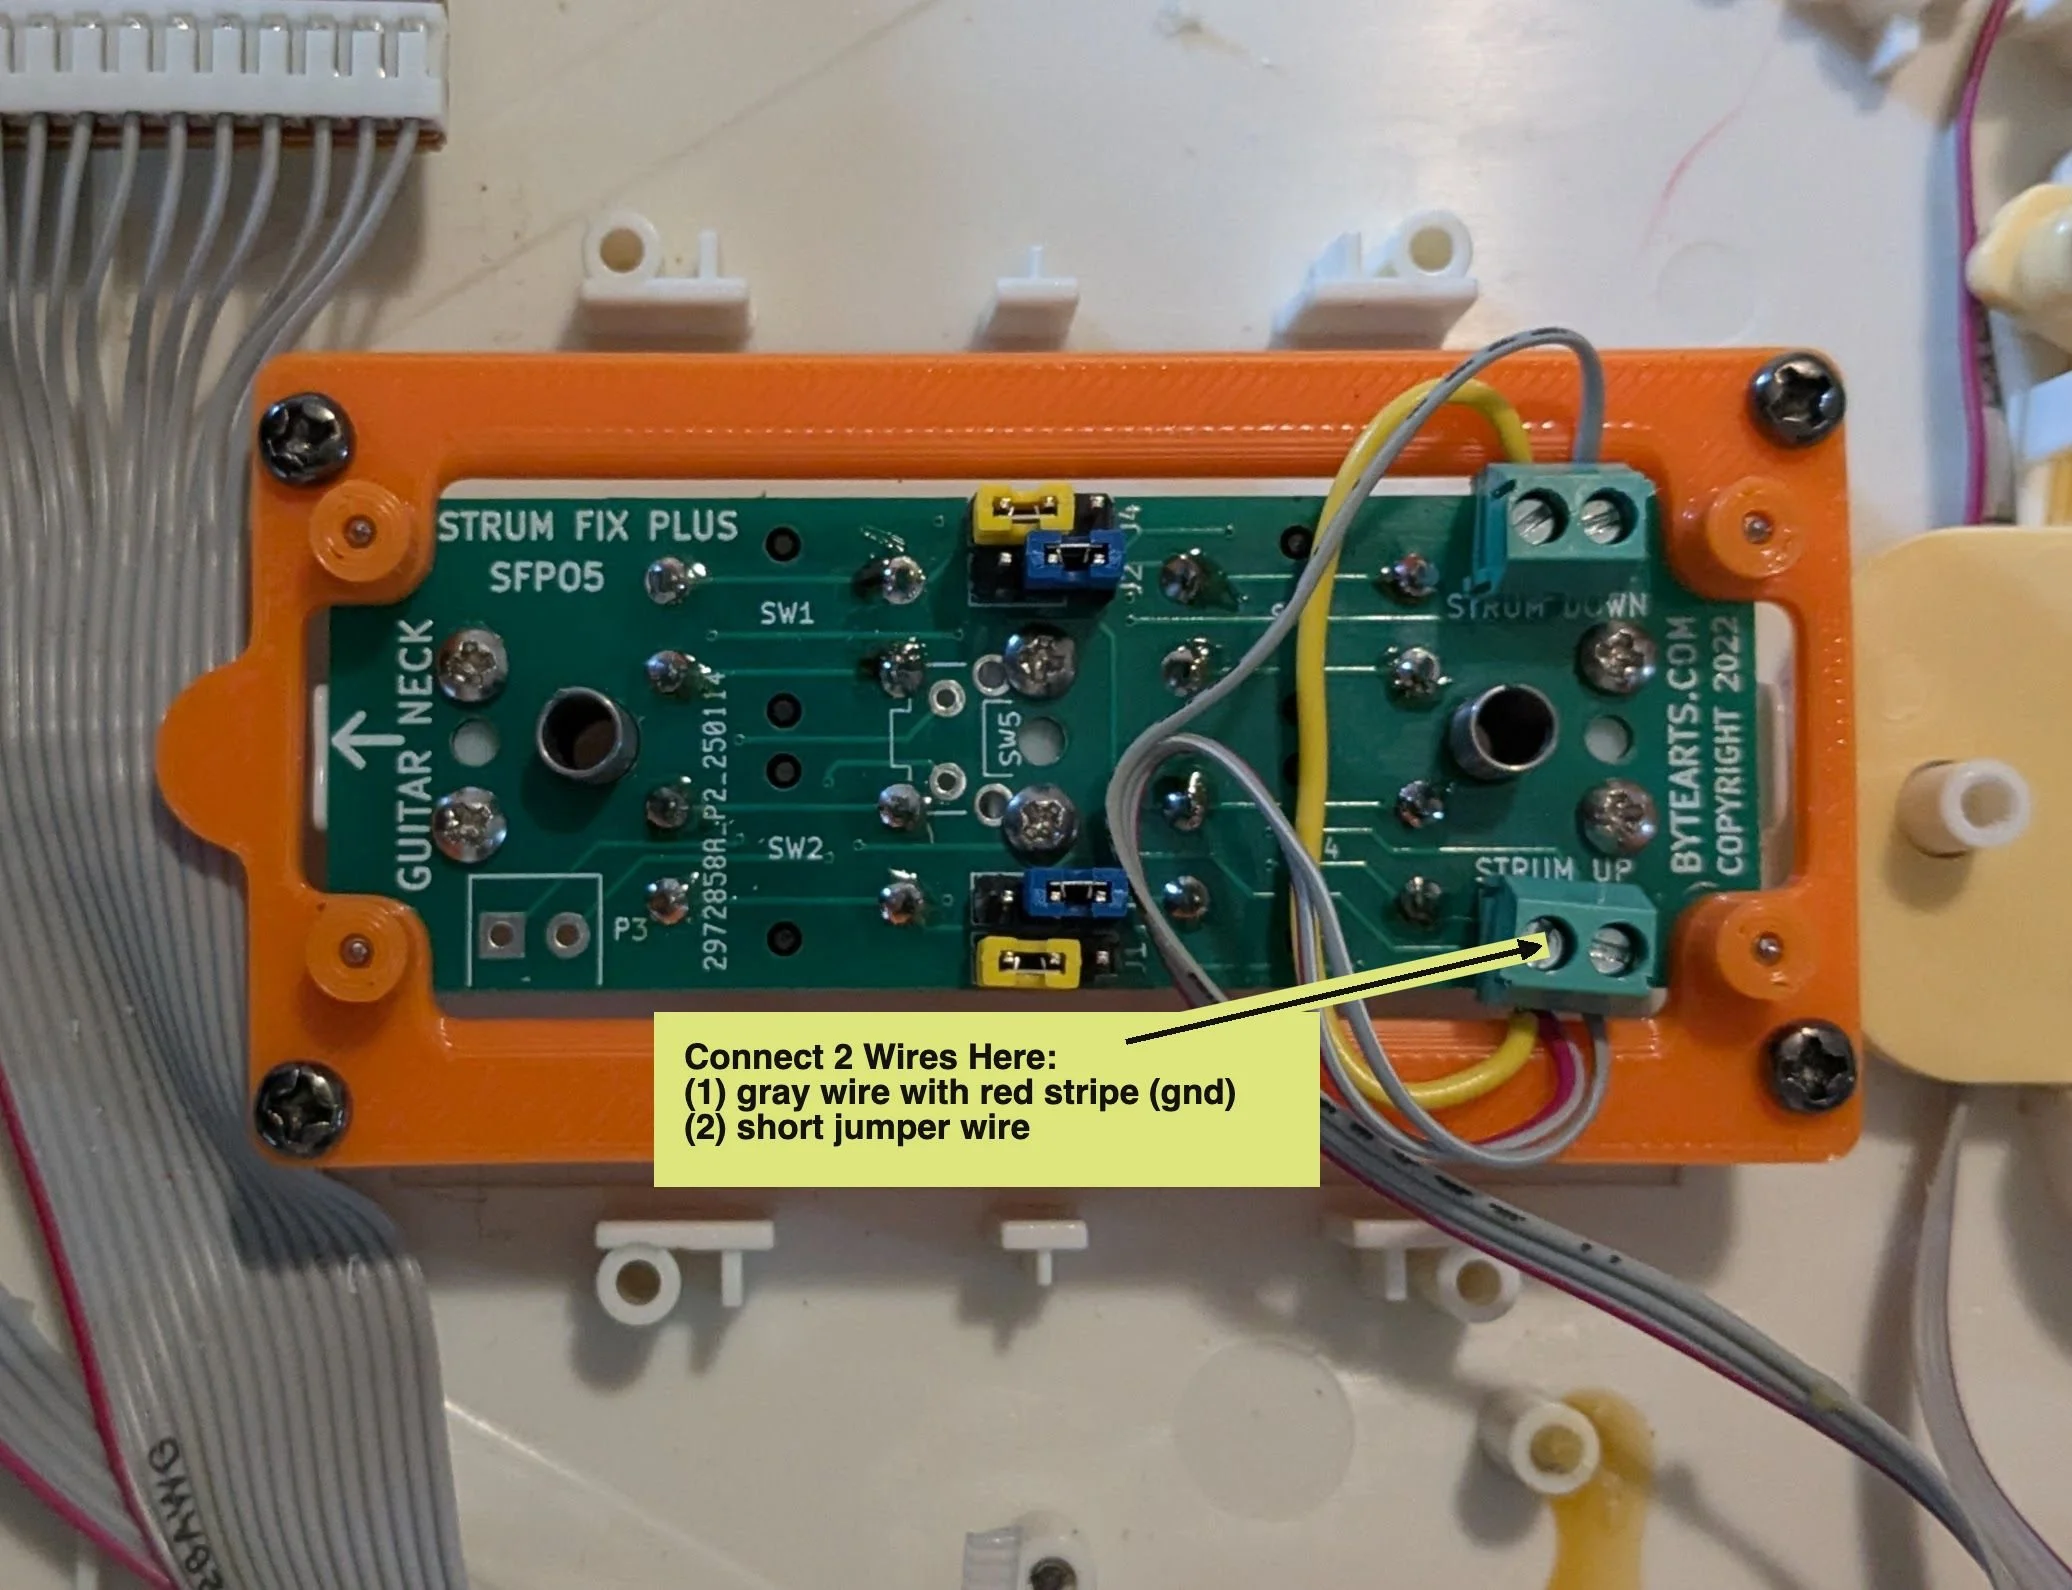
Wire connections for the wireless Prec Bass.
After connecting the red-striped wire and the short jumper wire into one slot of a screw terminal, connect the other end of the jumper wire into a slot on the other terminal, then connect the remaining 2 gray wires into the remaining open slots on the terminals.
If you are installing a Strum Fix DUO, then you really don't need to worry about which wire is the "strum up" or "strum down" connecting since on the DUO the split strum bars operate in opposite directions anyhow, which means one of the split strum bars will always be "reversed" compared to the other.
When using a "regular" Strum Fix Plus (not a DUO) you may need to test to find out which is the "up" strum and which is the "down" strum wire and may have to swap them around to get it correct. See the “Test” section below for more info.
Make sure the wires are securely connected, but don't over tighten the screws as it can cut through the wire. Give each wire a gentle tug to make sure it's securely connected.
Wired Bass
On the wired bass there are four pairs of wires connected between the motherboard and the strum switches, with 2 pairs for the “up” strum and 2 pairs for the “down”. Two pairs of wires are connected to the motherboard using a small 2-pin white connector, while the other pairs are soldered directly to the motherboard (see the pic below). The second pair of wires on each strum input (up or down) are redundant and don’t need to be connected to the Strum Fix — you can just coil them up and tape them in place out the way somewhere. Be careful that ends of the coiled wires aren’t exposed such that they could get shorted together.
Wired PBass connections
Here you can see the two sets of wires going from the motherboard to the Strum Fix. The “polarity” doesn’t matter — the wires can go into either slot of the green terminals on the Strum Fix.
Test
Before putting the guitar back together it's a good idea to test it. If you still have the batteries connected then go ahead and try turning on the guitar and connecting to a console or a PC and test that the strummer works properly. You can also plug it into a PC and then use this website (Gamepad Tester - Check Controllers and Joysticks Online) to test it.
Reassemble guitar
Reconnect the batteries and put the two halves of the guitar body back together and re-install the screws. Be careful to not pinch any wires when putting it back together, and don't over tighten the screws — they just need to be snug.